
Correct Inhaler Technique: A Step-by-Step Guide

For an MDI (metered-dose inhaler), press the canister once at the very start of a slow, deep breath and hold for about 10 seconds. For a DPI (dry powder inhaler), skip the press and inhale quickly and deeply instead. Using the right method for your specific device is what determines how much medicine actually reaches your lungs.
Here is a quick-reference summary:
- MDI without spacer: Shake, breathe out fully, begin inhaling slowly, press once, continue inhaling for 3–5 seconds, hold breath about 10 seconds.
- MDI with spacer: Shake, spray into the spacer, then inhale slowly and deeply within 5 seconds.
- DPI: Load the dose, exhale away from the device, then inhale quickly and deeply for 2–3 seconds, hold 5–10 seconds.
- After inhaled corticosteroids (ICS): Rinse your mouth and spit every time.
The American Thoracic Society notes that many patients receive a small fraction of an MDI dose in their lungs, often a low percentage, largely because of poor breath–actuation coordination. Getting the steps right is not a minor detail. It is the difference between a medication working and a medication sitting in the back of your throat.
Key Takeaways
Correct inhaler technique is the single most direct way to improve how much medication reaches your lungs, and most technique errors are correctable with one observed coaching session.
| Point | Details |
|---|---|
| MDI: coordinate and hold | Press once at the start of a slow 3–5 second inhalation; hold breath for about 10 seconds. |
| DPI: fast and deep | Inhale quickly and forcefully for 2–3 seconds; never exhale into the device. |
| Spacer reduces errors | Using a spacer improves airway delivery and reduces mouth deposition, especially for ICS users. |
| Rinse after ICS | Rinsing and spitting after every corticosteroid dose reduces thrush and hoarseness. |
| Garden State Medical Group | Hands-on technique checks and cardiopulmonary care are available in North Bergen and Secaucus, NJ. |
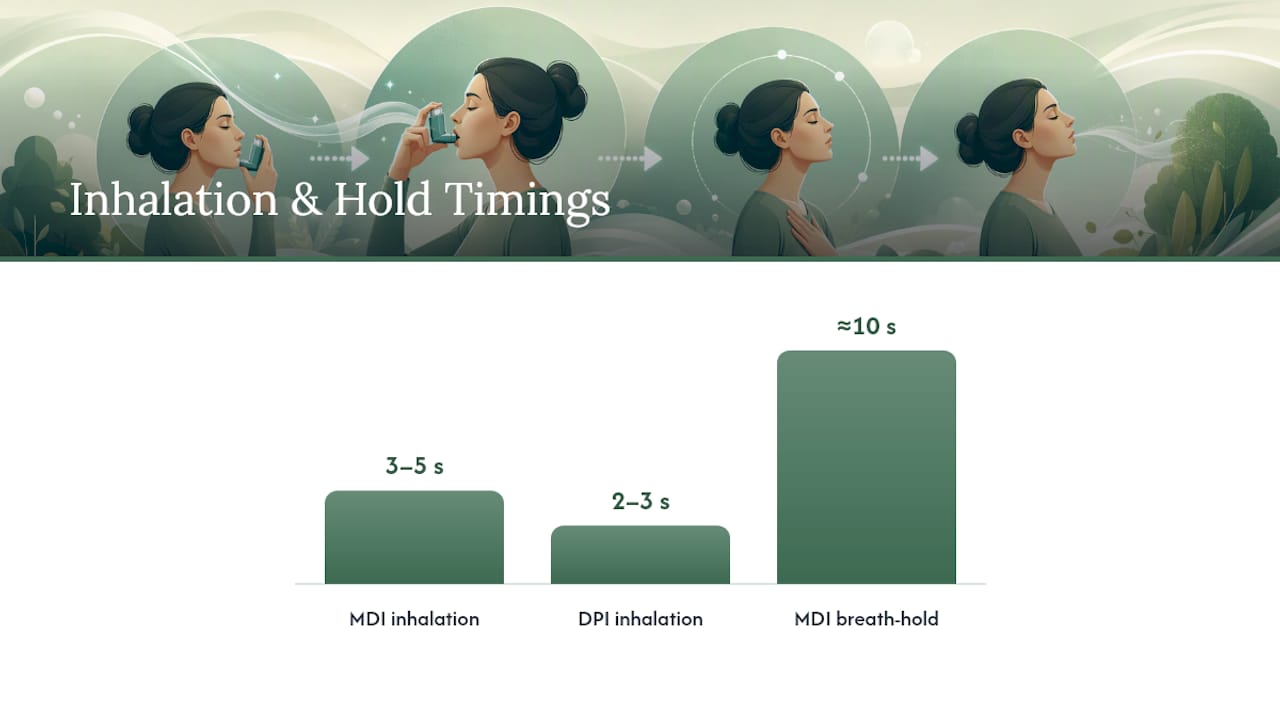
Table of Contents
- How to use a metered-dose inhaler without a spacer
- Does a spacer actually improve your MDI delivery?
- How to use a dry powder inhaler correctly
- Soft-mist inhalers and nebulizers: when do they matter?
- Common inhaler mistakes and how to fix them
- Timing between puffs, dose spacing, and aftercare
- Adapting technique for children, older adults, and flare-ups
- When should you get a clinician inhaler technique check?
- Why technique checks matter more than most patients realize
- Hands-on inhaler technique checks at Garden State Medical Group
- Useful resources for learning and practicing inhaler technique
- Sources
- FAQ
How to use a metered-dose inhaler without a spacer
The core MDI action is this: press the canister exactly once at the moment you begin a slow, controlled inhalation. Pressing too early or too late is the most common reason medicine deposits in the mouth rather than reaching the airways.
Follow these MedlinePlus-aligned steps for proper MDI use:
- Remove the mouthpiece cap and check for debris inside.
- Hold the inhaler upright and shake it well for 5 seconds.
- If the inhaler is new or has not been used in more than 2 weeks, prime it by spraying 2–4 test puffs into the air (away from your face). Check your device’s instructions for the exact number.
- Breathe out fully, away from the mouthpiece.
- Seal your lips around the mouthpiece (or hold it 1–2 inches from your open mouth if your device instructions allow).
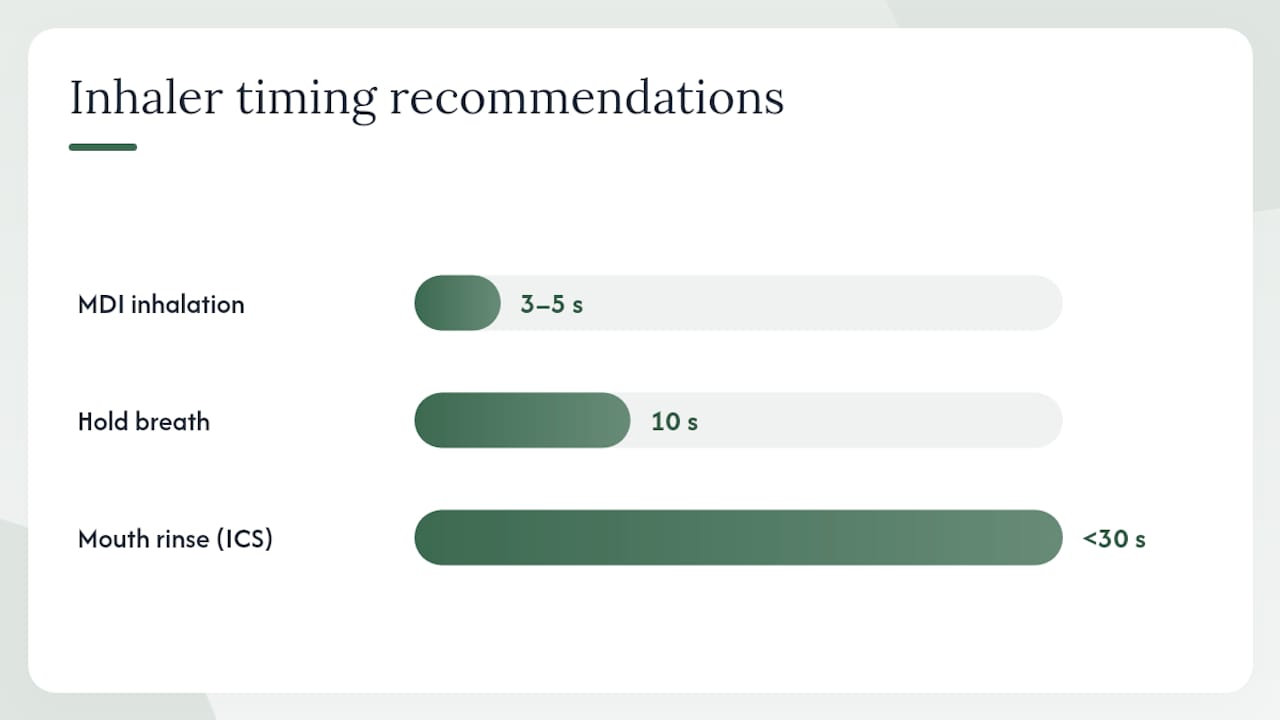
- Begin inhaling slowly, then press the canister down once. Continue inhaling slowly and deeply for 3–5 seconds.
- Remove the inhaler and hold your breath for about 10 seconds, or as long as you comfortably can.
- If a second puff is prescribed, wait at least 1 minute before repeating steps 2–7.
- Replace the cap after use.
For timing between quick-relief puffs, waiting about 1 minute between doses gives the first puff time to open the airways slightly, which may help the second dose reach deeper. The NHLBI patient guide recommends inhaling slowly for 3–5 seconds and holding your breath to a count of 10.
Pro Tip: If you struggle to coordinate the press and the breath, try counting aloud: “one” as you start inhaling, then press on “two.” Practicing with an empty or expired inhaler at home builds the muscle memory before you need it during a flare.
Does a spacer actually improve your MDI delivery?
Yes, and significantly. A spacer (also called a holding chamber) removes the need for perfect breath–actuation coordination by holding the medication cloud in a chamber until you are ready to inhale. MedlinePlus notes that spacers are useful for most children, many adults, and anyone using inhaled corticosteroids.
Steps for MDI with spacer:
- Attach the spacer firmly to the mouthpiece.
- Shake the inhaler for 5 seconds.
- Spray one puff into the spacer.
- Place your lips around the spacer mouthpiece and inhale slowly and deeply within 5 seconds of spraying.
- Hold your breath for up to 10 seconds if possible.
- If tidal breathing is needed (see below), take 2–3 normal-sized breaths through the spacer instead of one deep breath.
- Wait 1 minute before a second puff, then repeat from the shake step.
Single-breath vs. tidal breathing through a spacer
The single deep breath is the preferred method for most adults. Tidal breathing (2–3 normal breaths) is the better option for young children who cannot follow breath-hold instructions, for patients who are very breathless during a flare, and for anyone using a mask attachment rather than a mouthpiece. Both methods deliver more medication than an MDI used without a spacer.
Spacer cleaning: Wash the spacer in warm, soapy water once a week. Let it air dry without rinsing, since rinsing with water can cause static that makes medication stick to the walls. Replace the spacer every 6–12 months or per the manufacturer’s recommendation.
Pro Tip: For young children or older adults using a mask attachment, press the mask gently but firmly against the face to prevent air leaks around the seal. Even a small gap reduces the dose delivered.
How to use a dry powder inhaler correctly
The most important thing to know about a DPI is that your breath activates the dose. There is no canister to press. You load the device, then inhale quickly and forcefully to pull the powder into your airways.
Follow these steps, based on Kaiser Permanente’s DPI care instructions:
- Open or load the device according to its specific instructions (each DPI model differs: Diskus, Turbuhaler, Ellipta, and Handihaler all load differently).
- Hold the device level, away from your mouth.
- Breathe out fully, but exhale away from the mouthpiece. Never breathe into a DPI — moisture from your breath can clump the powder and ruin the dose.
- Seal your lips tightly around the mouthpiece.
- Inhale quickly and deeply for 2–3 seconds. You need enough inspiratory force to pull the powder off the device.
- Remove the device and hold your breath for 5–10 seconds.
- Close or reset the device per its instructions.
DPIs are sensitive to moisture, so store them in a dry place and never leave them in a humid bathroom. Loading steps vary by model, so always follow the manufacturer’s guide for your specific device rather than relying on general instructions.
Pro Tip: If you feel breathless or have weak inspiratory flow, a DPI may not be the right device for you. Ask your clinician to assess your peak inspiratory flow. Patients with low flow often do better with an MDI and spacer or a soft-mist inhaler.
Soft-mist inhalers and nebulizers: when do they matter?
Not every patient does well with an MDI or DPI. Soft-mist inhalers (SMIs) and nebulizers fill specific gaps.
Soft-mist inhalers (e.g., Respimat):
- Produce a slow-moving aerosol cloud that lasts longer than an MDI spray, giving you more time to inhale.
- You still coordinate inhalation with actuation, but the slower spray makes that coordination easier.
- Portable and compact, similar in size to an MDI.
- Typically recommended for patients who struggle with MDI coordination but cannot generate sufficient inspiratory flow for a DPI.
Nebulizers:
- Convert liquid medication into a fine mist delivered over 5–15 minutes through a mask or mouthpiece.
- Require no coordination or inspiratory effort, making them well-suited for very young children, frail older adults, and patients in acute distress.
- Less portable and slower than handheld devices.
- Clinicians typically prescribe home nebulizers for patients with severe or frequent flare-ups, or when other devices are not tolerated.
The right device depends on your age, inspiratory strength, coordination ability, and how well your symptoms are controlled. A clinician can match you to the best option.
Common inhaler mistakes and how to fix them
Most delivery failures come down to a handful of repeatable errors. Recognizing yours is the first step to fixing it.
- Not coordinating breath and press (MDI): The medicine sprays into the back of the throat instead of the lungs. Fix: use a spacer, or practice the “start inhaling, then press” sequence until it is automatic.
- Inhaling too fast with an MDI: A fast inhalation causes turbulent airflow that deposits medicine in the upper airway. Fix: aim for a slow, steady 3–5 second breath.
- Inhaling too slowly with a DPI: DPIs need a fast, forceful breath to activate. Fix: inhale quickly and deeply, as if you are trying to “pull” the powder in.
- Exhaling into a DPI: Moisture clumps the powder and reduces the dose. Fix: always turn your head away from the device before exhaling.
- Skipping the shake or prime: An unshaken MDI can deliver an inconsistent dose because the propellant and medication separate over time. Fix: shake before every use and prime after periods of nonuse.
- Not holding the breath: Releasing the breath immediately after inhaling reduces the time medication has to deposit in the airways. Fix: hold for 10 seconds, or count to 10 silently.
Inhaled corticosteroids and oral side effects: If you use an ICS (such as fluticasone, budesonide, or beclomethasone), rinsing your mouth with water and spitting immediately after every dose reduces the risk of oral thrush and hoarseness. The NHLBI specifically recommends this step, and it takes less than 30 seconds.
Pro Tip: Build technique checks into your routine by practicing at the same time you take your medication. Once a month, demonstrate your technique to a family member or caregiver and ask them to watch for the common errors above. This informal teach-back catches drift before it affects your symptom control.
Timing between puffs, dose spacing, and aftercare
Getting the steps right matters, but so does the timing around each dose.
- Breath-hold goal: Aim for 10 seconds after each inhalation. If 10 seconds is not possible, 5 seconds still provides meaningful benefit.
- Between quick-relief (SABA) puffs: Wait about 1 minute between puffs of a short-acting bronchodilator such as albuterol. This brief pause allows the first puff to begin opening the airways.
- Controller medications: For most controller inhalers (ICS, ICS/LABA combinations), there is no required wait between puffs beyond what the prescription specifies. Follow your prescriber’s instructions.
- After ICS use: Rinse your mouth with water and spit. Do not swallow the rinse water.
- Device counter: Check the dose counter after each use. Replace the inhaler before it reaches zero, not after.
- Storage: Keep MDIs at room temperature (59–77°F). Avoid leaving them in a hot car or freezing temperatures, both of which affect propellant pressure and dose delivery.
| Timing parameter | Recommended guidance |
|---|---|
| Breath-hold after inhalation | ~10 seconds (5–10 seconds acceptable) |
| Wait between SABA puffs | ~1 minute |
| Tidal breaths through spacer (if needed) | 2–3 normal breaths |
| DPI inhalation duration | 2–3 seconds (fast and deep) |
| MDI inhalation duration | 3–5 seconds (slow and deep) |
The NHLBI guide and MedlinePlus both support the 10-second breath-hold and the slow 3–5 second inhalation for MDIs as the standard of care.
Adapting technique for children, older adults, and flare-ups
Standard single-breath technique works well for most adults, but children, older adults, and patients in acute distress often need a modified approach.
For young children (typically under age 5):
- Use an MDI with a spacer and a properly fitted mask (not a mouthpiece).
- Hold the mask firmly against the face to prevent air leaks.
- Spray one puff into the spacer.
- Allow the child to take 2–3 tidal breaths through the mask. The WHO inhaler technique guidance recommends this multiple-breath method when a child cannot coordinate a single deep breath.
- Repeat per the prescribed dose.
- Clean the mask and spacer after each use for pediatric patients.
For older adults or patients with weak inspiratory flow:
- An MDI with spacer or a soft-mist inhaler is usually more effective than a DPI.
- Tidal breathing through a spacer is a reasonable alternative when a deep breath is not possible.
- Check grip strength and hand coordination: some patients benefit from a breath-actuated MDI that fires automatically when they inhale.
During an acute flare-up:
- Tidal breathing through a spacer is acceptable when a patient is too breathless for a full deep breath.
- A nebulizer may be used if prescribed for home emergency use.
- After any emergency department visit or severe flare, schedule a clinician technique review. The WHO guidance specifically recommends reassessing technique after emergency presentations.
Pro Tip: For caregivers managing a child’s inhaler, count the tidal breaths aloud while watching the spacer valve move. If the valve does not move, the mask seal has a leak. Adjust the angle and recheck before continuing.
When should you get a clinician inhaler technique check?
Get a technique check when your symptoms are not well controlled despite taking your medication as prescribed, or after any emergency department visit for a respiratory flare. A single observed session with a clinician corrects coordination errors, confirms device selection, and often improves symptom control without changing the prescription.
The American Thoracic Society reports that many patients receive less than 25% of the nominal MDI dose in their lungs, with many receiving less than 15%, primarily because of technique errors. Correcting those errors through a clinician-led check is one of the most direct ways to improve medication delivery.
What to bring to your technique check:
- All inhalers you currently use (bring the actual devices, not just the names)
- Your spacer or holding chamber
- Device instructions or package inserts if you have them
- A recent symptom diary or notes on when your symptoms are worst
- Your full medication list
What happens during the visit:
- The clinician observes you using each device and identifies specific errors.
- You receive corrected instructions and demonstrate the technique back (teach-back).
- The clinician checks spacer fit and may recommend a different spacer or mask size.
- If your inspiratory flow is in question, a pulmonary function test or peak flow measurement may be ordered.
- A follow-up plan is set to recheck technique at the next visit.
The NHLBI recommends that providers review inhaler technique at every follow-up visit, not just at diagnosis. The CDC also frames inhaler technique as a teachable self-care skill, with follow-along videos available for patients to practice at home before a clinic visit. The American Lung Association offers device-specific patient instructions and demos, including Spanish-language resources, to support patients between appointments.
Why technique checks matter more than most patients realize
The most common assumption patients make is that if they are taking their inhaler, they are getting the medication. That assumption is often wrong. The American Thoracic Society’s data on lung delivery fractions tells a clear story: poor technique is not a minor inefficiency. For many patients, it means the medication is largely depositing in the mouth and throat rather than reaching the airways where it is needed.
What makes this particularly worth addressing is that technique errors are fixable. A single observed coaching session, where a clinician watches you use your device and gives you corrective feedback, reliably identifies the specific errors causing delivery failure. Patients who go through a teach-back session typically leave with a corrected technique they can sustain. That is a better first step than adjusting the prescription, which is often what happens when poor technique goes unrecognized.
There is also a side-effect dimension that gets underappreciated. Patients who use inhaled corticosteroids and skip the mouth rinse are exposing their oral tissue to residual medication unnecessarily. The fix is 30 seconds of rinsing and spitting. Patients who use a spacer reduce that mouth deposition further. These are not complicated interventions. They just require someone to explain them clearly and confirm the patient is doing them.
The practical takeaway: if your symptoms are not where you want them to be, bring your inhaler to your next appointment before asking about a stronger medication. A technique review is the right first question.
Hands-on inhaler technique checks at Garden State Medical Group
Correct inhaler use is a skill, and like any skill, it benefits from direct observation and feedback. At Garden State Medical Group, our cardiopulmonary care team provides hands-on inhaler technique assessments as part of respiratory care visits at our North Bergen and Secaucus, New Jersey locations.

A technique check visit includes a clinician observing your current method, identifying specific errors, fitting or recommending a spacer, and walking through corrected steps with a teach-back confirmation. If your symptoms suggest a need for further evaluation, on-site pulmonary function testing is available. Telemedicine visits are also an option for patients who want a preliminary review before coming in. To schedule your inhaler technique assessment, visit our primary care page or call our office directly. Bring all your current inhalers and your spacer to the appointment.
Useful resources for learning and practicing inhaler technique
These authoritative sources offer step-by-step guides, patient-facing videos, and device-specific instructions you can use at home and bring to your next clinic visit. Watch the videos first, then practice your technique and confirm it with a clinician using the teach-back method.
- MedlinePlus: How to Use Metered-Dose Inhalers — stepwise MDI instructions with timing details
- MedlinePlus: How to Use an Inhaler with a Spacer — spacer technique and cleaning guidance
- American Lung Association: MDI Patient Instructions and Demos — device-specific pages with Spanish-language options
- CDC: Caring for Someone with Asthma — follow-along videos and self-care framing
- NHLBI: How to Use a Metered-Dose Inhaler — comprehensive step sequence and rinse-after-ICS guidance
- American Thoracic Society: MDI Patient Resource — delivery-loss data and spacer rationale
- Garden State Medical Group: Lung Health Management Guide — practical lung health self-care for patients managing chronic respiratory conditions
This article is general information, not a substitute for advice from a qualified doctor. Consult a qualified healthcare professional about your own circumstances before acting on anything here.
Sources
- How to Use Metered-Dose Inhalers: MedlinePlus Drug Information
- How to use an inhaler - with spacer: MedlinePlus Medical Encyclopedia
- How to Use a Metered-Dose Inhaler | American Lung Association
- Caring for someone with asthma | CDC
- Metered-dose inhaler (MDI) - American Thoracic Society
- How to Use a Metered-Dose Inhaler | NHLBI
FAQ
What is the correct technique for using an MDI?
Press the canister once at the very start of a slow, 3–5 second inhalation, then hold your breath for about 10 seconds. If coordination is difficult, attach a spacer and inhale within 5 seconds of spraying.
What are the key steps for using an inhaler correctly?
Remove the cap, shake the MDI, breathe out fully away from the device, begin inhaling slowly, press once, continue inhaling for 3–5 seconds, and hold your breath for about 10 seconds. For a DPI, load the dose, exhale away, then inhale quickly and deeply for 2–3 seconds.
What is the easiest inhaler technique for someone with coordination problems?
Using an MDI with a spacer is the most forgiving method. Spray one puff into the spacer, then inhale slowly within 5 seconds. Patients who cannot take a deep breath can use 2–3 tidal breaths through the spacer instead.
When should the tidal breathing technique be used with a spacer?
Tidal breathing through a spacer is recommended for young children who cannot follow breath-hold instructions, for patients who are very breathless during a flare-up, and for anyone using a mask attachment rather than a mouthpiece.
How do you know if your inhaler technique needs to be corrected?
If your symptoms are not well controlled despite taking your medication as prescribed, or if you have recently visited an emergency department for a flare, schedule a clinician technique check.
Recommended
- 6 Breathing Techniques to Relieve Asthma Symptoms - What to Know | Garden State Medical Group | Garden State Medical Group
- 4 Tips for Achieving Better Lung Health | Garden State Medical Group | Garden State Medical Group
- Your Guide to Lung Health Management That Works
- Lung Health Tips: Practical Ways to Breathe Better